

Starting seeds indoors
Seeds lay dormant, waiting for certain conditions to be met. One helpful resource is the Farmer's Almanac. Some seeds require a specific set of circumstances to occur before the seeds break dormancy. For instance, many spring wildflowers can take a year or 2 to germinate, needing to experience winter temperature fluctuations before they germinate. Luckily, however, most of the popular vegetables and flowers are less demanding in their requirements, germinating speedily with average indoor temperatures, consistent moisture and various amounts of light.
Andover Seed Library Seed Starting Workshop - A group of experienced Andover gardeners share tips and best practices for starting seeds and nurturing seedlings
Requirements for seeds to break dormancy
- Planting medium – use a soilless mixture to prevent disease.
- Heat – average room temperature (about 70 degrees).
- Moisture – seeds cannot dry out but should not be overwatered.
- Air (oxygen and carbon dioxide) – good air ventilation and low humidity will help prevent disease.
- Light – some seeds require light for germination, some don’t. Check the seed packet.
Materials you’ll need to start seeds
- Containers – Many types can be used. All containers should be sterilized by soaking for 10 minutes in a bucket with 2 tablespoons bleach and 1 gallon of water.
- Potting mixture – should be lightweight, well aerated and sterile (free of disease).
- Heat – Many warm season vegetable seeds, such as tomatoes and peppers, require a soil temperature range of 70-85 degrees. It’s highly recommended that you purchase a heat mat, which will keep the containers at a constant, consistent heat.
- Light - some seeds require light for germination, others don’t. Read seed packet for details. All plants require light after germination. Use overhead fluorescent lights for best results, no need for special plant lights. Should be 1-2 inches above plants, turned on for at least 12 hours, 16 hours is optimal.
Step by step procedure
- Prepare labels with date, variety and species.
- Sterilize containers.
- Mix and moisten potting medium in bucket. When no water leaches out when squeezed, it is moist.
- Plant seeds, not too thickly, usually 2-4 seeds per pot or cell.
- Cover seeds with soil mixture, see seed packet for seed depth.
- Gently press soil for good contact.
- Water with spray bottle until top layer of soil is moist.
- Set containers in tray and cover with plastic or dome.
- Set tray on heat mat.
- Check seed tray daily to ensure soil is moist, and mist if needed.
- Adjust light to within 1-2 inches of top of container and turn on.
- Ventilate cover regularly.
- Remove cover once approximately ½ of seedlings have emerged (or even earlier).
- When first true leaves appear, remove seedlings from heat.
- Start to fertilize twice a week with fish emulsion, sea kelp or other organic fertilizer.
Damping off – most common cause of seed starting failure
- Cover mixture with peat moss after seeds are sown.
- Use sterile, soil-less mixture.
- Sterilize containers.
- Keep soil level high, don’t bury seeds too deeply.
- Don’t let moisture accumulate and don’t overwater.
- Water seedlings with cooled, diluted chamomile tea, which has anti-fungal properties; this can help with damping off.
- Keep plants well ventilated – use fan if necessary.
- Don’t crowd plants.
Microgreens - how to grow them
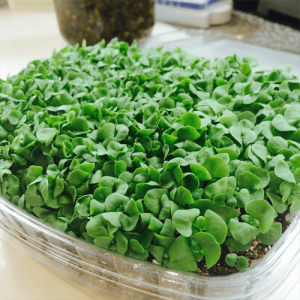
Don’t wait for spring to begin planting. Consider growing some microgreens. The best part is it can be done right in your kitchen window or available windowsill. They grow quickly, easily and may be harvested as soon as 1 week from planting.
“Microgreens” is a marketing term used to describe tiny, tender, edible greens that germinate in soil or a soil substitute from the seeds of vegetables and herbs. Smaller than “baby greens,” and harvested later than “sprouts,” microgreens can provide a variety of leaf flavors, such as sweet and spicy. They are also known for their various colors and textures. Among upscale markets, they are now considered a specialty genre of greens that are good for garnishing salads, soups, plates, and sandwiches. The seeds used to grow microgreens are the same seeds that are used for full sized herbs, vegetables and greens. Microgreens are simply seedlings that are harvested before they develop into larger plants. A microgreen is a seedling having a central stem which has been cut just above the soil line during harvesting. It has two fully developed cotyledon leaves, and usually one pair of very small, partially developed true leaves. Beet Microgreens (Photo courtesy of Wendy Kiang-Spray)
Ten Microgreens Easy for Beginners
- Chinese Cabbage (Napa cabbage): quick, easy, beautiful, and flavorful
- Radish (red or Daikon): quick, easy, and flavor just like the mature root crop
- Turnip: quick, easy, and “leaf” varieties taste much like the root veggie
- Pac Choi (Bok Choy): its many varieties all are quick and easy to grow
- Sesame: germinates rapidly, and you likely already have it in your cupboard
- Cress: a speedster second only to Radish, but very spicy hot
- Lettuce: at true leaf stage, most varieties are beautiful and delectable
- Asian Greens: especially Komatsuna, which tolerates both cold and heat
- Endive: beautiful bouquet of leaves, grows easily, though slowly
- Mustard (and many Mustard Greens): quick and easy, but very spicy hot
Several varieties can be mixed together to create combinations of tastes, textures and colors.
The time from seed to harvest varies between crop species, however, many seedlings will be ready for harvest in 7 to 14 days. Microgreens are harvested at the first true-leaf stage. They are harvested at the soil line and do not include the roots. They are typically 1 to 3 inches in height. Microgreens do not store well and should be consumed shortly after harvesting. They are also not recommended for cooking, due to their high water content. It is best to be extremely gentle when washing microgreens, due to their delicate nature.
Microgreens are not the same as sprouts. Some articles about microgreens characterize them as being very much the same as sprouts, however, there are several important differences. Sprouts are simply germinated seeds. What is eaten consists of the seed, root, stem and pale, underdeveloped leaves. Sprouts are produced entirely in water. The seed is not actually planted. The seed germinates rapidly due to the high moisture and humidity levels maintained in the enclosures. The sprouting process occurs in dark or very low light conditions. These dark, warm, wet, crowded conditions are ideal for the rapid proliferation of dangerous pathogenic bacteria. Microgreen seeds are planted and grown in soil or a soil substitute such as peat moss or other fibrous materials. They are ideally grown in high light conditions with low humidity and good air circulation. The seed density is a fraction of what is used in sprout processing, so each individual plant has space in which to grow and develop. Most varieties require 1-2 weeks growing time, some 4-6 weeks. After the leaves are fully expanded the microgreens are ready for harvest. Microgreens that are grown in sunlight with plenty of space and good ventilation have increased vigor, resulting in more color and flavor compared to those grown under artificial lights. The conditions that are ideal for growing microgreens do not encourage the growth of dangerous pathogens. These growing methods would not work for the production of sprouts.
Growing microgreens is easy, doesn’t require expensive equipment and may be grown right on your windowsill. Here’s how to do it:
Supplies:
Disposable aluminum loaf pan* (or other container, i.e.. plastic, ceramic, clay, etc.)
Soil-less potting mix (I used pro-mix, consisting of peat moss, vermiculite and perlite)
One or more varieties of seeds suitable for microgreens, i.e. lettuce, kale, cilantro, arugula, basil, radish, mustard, cabbage, etc.
Small piece of plastic wrap
Directions:
- Fill the container 3/4 full with the soil-less potting mix.
- Sprinkle seeds thickly over the surface of the soil. The seeds can be close together since they only need to grow to the size of the first true leaf.
- Water the seeds just enough to moisten them. I use a gentle water stream, otherwise the seeds will take a swim. If the soil looks like it has too much water, gently drain excess water out the side, without spilling any soil.
- Label your garden.
- Cover the loaf pan with plastic wrap and place in a dark spot.
- Check your little garden daily until the seeds have sprouted.
- Once the seeds have sprouted, remove the plastic wrap and place in a sunny window.
- Begin snipping greens any time after the cotyledon leaves have emerged or after the first true leaves. Water gently whenever needed.
Enjoy!
How to Grow Microgreens in Your Windowsill
Copyright © Julia Dimakos. 24 Jan 2017 www.juliadimakos.com